


Instrument Handling
Title: Instrument Handling
Author: Charles Bouchard, MA, MD. John Mulcahy Professor and Chair, Department of Ophthalmology, Loyola University
Date: 04/12/2019
Keywords/Main Subjects: Cataract Surgery, Instrument, Handling
Diagnosis: NA
Brief Description: Proper ophthalmic instrument handling, as demonstrated by Dr. Charles Bouchard, MA, MD. John Mulcahy Professor and Chair, Department of Ophthalmology.
Format: mp4
Identifier: Moran_CORE_26483
Copyright statement: Copyright 2019. Please see terms of use page for more information.
Pre-Chop
Home / Ophthalmic Surgery / Lens and Cataract Surgery
Title: Pre-Chop
Authors: Troy Teeples, MSIV, Tara Hahn, MD, Nikko Ronquillo, MD, Jeff Pettey, MD
Photographer: Troy Teeples, MSIV University of Utah School of Medicine
Date: 12/o6/2018
Keywords/Main Subjects: Pre-chop, cataract surgery
Brief Description: Pre-chop is a technique used in cataract surgery to divide the lens without the use of ultrasonic energy.
Introduction:
Pre-chopping is a nuclear fragmentation technique implemented prior to phacoemulsification of the lens. Using a prechopper, the nucleus is divided typically into two to four pieces to help facilitate lens removal using phacoemulsification. The use of this technique decreases the use of ultrasonic energy and intraocular irrigation compared to other phacoemulsification division techniques such as divide-and-conquer.
Technique Description:
Following routine hydrodissection, a small amount of viscoelastic is injected to aid in visualizing the anterior surface of the lens. Next, the Akahoshi prechopper instrument is introduced into the eye via the main clear corneal incision. The sharp point of the spatulated blades is entered into the center of the nucleus, following which the blades are slowly spread apart to divide the nucleus into two halves. As seen in the video, the surgeon may rotate the prechopper with the sharp end pointing away from the nucleus and repeat the spreading of the nuclear halves to ensure complete nuclear division. At this point the decision may be made to rotate the nucleus and further divide the nucleus into 4 quadrants using the prechopper or to proceed to phacoemulsification.
Faculty Approval by: Jeff Pettey, MD
Format: video
Identifier: Moran_CORE_25910
Copyright Teeples, ©2018. For further information regarding the rights to this collection, please visit: Moran CORE Terms of Use
Disclosure (Financial or other): None
Horizontal Chop and Vertical Chop
Title: Horizontal Chop and Vertical Chop
Author (s): Troy Teeples, MSIV, Nikko Ronquillo, MD, Jeff Pettey, MD
Photographer: Troy Teeples, MSIV University of Utah School of Medicine
Date: 11/6/2018
Keywords/Main Subjects: Phaco chop, horizontal chop, vertical chop, cataract surgery
Brief Description: Horizontal and vertical chop are two techniques that use manual instrument forces to segment the nucleus in mere seconds during cataract surgery. Here we describe these two techniques.
Introduction:
Horizontal and vertical chop are two phaco chop techniques which utilize the phacoemulsification handpiece and a second instrument to fragment the nucleus into multiple segments. As compared to the standard divide-and-conquer technique, these approaches require less ultrasonic energy.
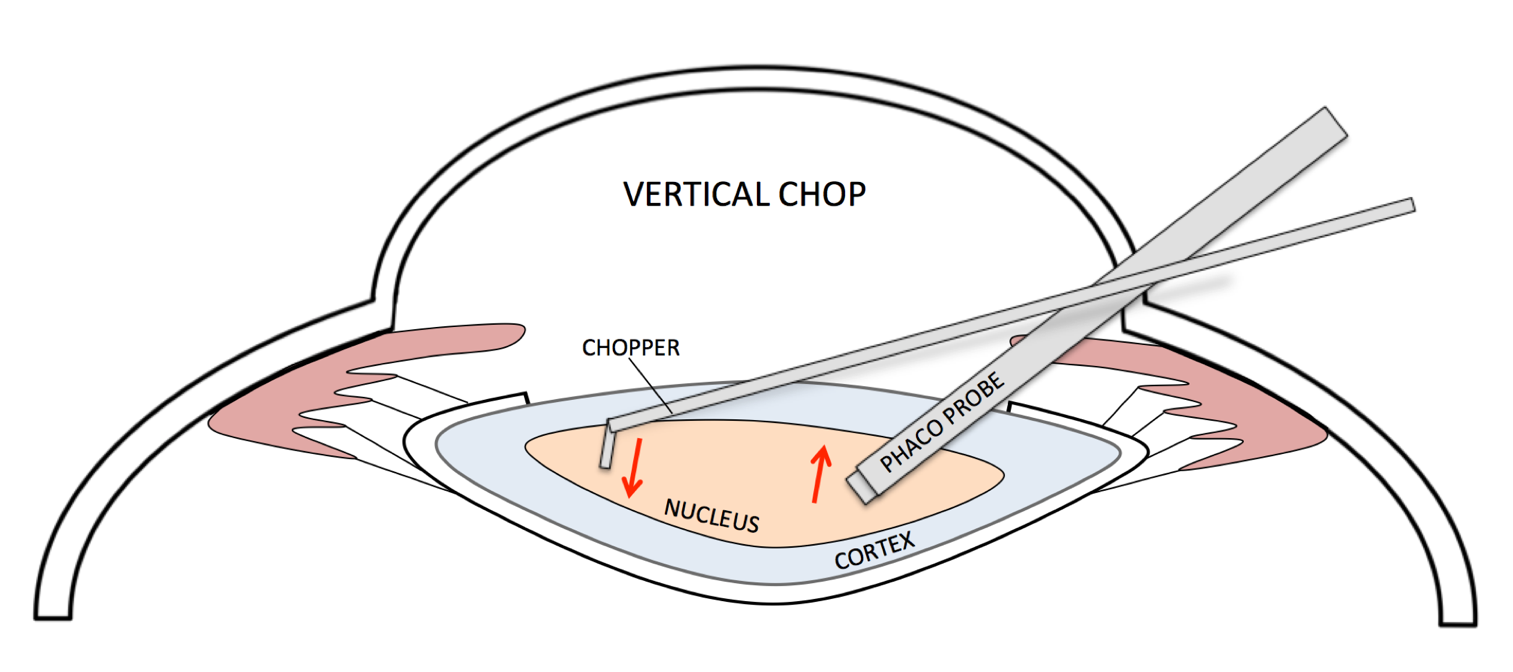
The basic concept of chopping is holding the nucleus in place with the phaco probe while a chopping instrument splits it into pieces. Much like cutting a piece of meat with a fork and knife, it is paramount that the phaco probe hold the cataract in place with a high enough vacuum level to allow the chopper to fragment the nucleus. Properly performed, nucleus segmentation by horizontal and vertical chop are extremely efficient approaches during cataract surgery.
While either technique may be used for most types of cataracts, horizontal chop is best suited used for softer density lenses of the 1-2+ NS grading while vertical chop is easier to perform in more dense lenses of the 2-3+ variety.
Technique Description:
In horizontal chop, a chopper is passed under the capsulorhexis and hooked under the lens equator. The phaco tip is buried into the nucleus to hold the nucleus in place and the chopper is then moved horizontally, or towards the phaco tip. A horizontal crack through the nucleus is accomplished when the chopping instrument and phaco tip are moved in opposite directions, as seen in the video. The nucleus is then rotated, and the horizontal chop can be repeated to the heminuclei to divide the lens nucleus into four fragments. Phacomulsification of each individual fragment then ensues.


In vertical chop, the phaco tip is embeded into the nucleus using a high vacuum setting in order to keep the nucleus fixed in place, similar to horizontal chopping. However; in contrast to horizontal chopping, the chopper is impaled to the nucleus just anterior to the phaco probe and moved downwards (posteriorly) while the phaco probe moves in the opposite direction upwards (anteriorly). This creates a horizontal crack through the nucleus. This crack is accomplished by moving the chopping instrument and phaco tip in opposite directions laterally. The nucleus is rotated and the two heminuclei can then be vertically chopped. Phacoemulsification of each individual fragment then ensues.

Faculty Approval by: Jeff Pettey, MD
Identifier: Moran_CORE_25803
Copyright Teeples, ©2018. For further information regarding the rights to this collection, please visit: Terms of Use
Malyugin and I-Ring: Insertion and Removal
Home / Ophthalmic Surgery / Lens and Cataract Surgery
Title: Malyugin and I-Ring: Insertion and Removal
Authors: Troy Teeples MSIV, Nikko Ronquillo MD, Jeff Pettey MD
Photographer: Troy Teeples MSIV, University of Utah School of Medicine
Date: 10/9/2018
Keywords/Main Subjects: Malyugin ring; I-Ring; cataract surgery
Brief Description: A pupil expansion device is an important tool used during cataract surgery in situations where the pupil dilates poorly, including floppy iris syndrome. Here we discuss the proper insertion and removal of both the Malyugin ring and the I-Ring.
Introduction:
Pupil miosis refractory to dilation protocols can shrink the surgical field of view and make phacoemulsification unnecessarily difficult. The use of a pupil expansion device is an effective way to increase the pupil size and enhance the surgeon’s field of view, thus making nucleus fragmentation and extraction both easier and safer. The Malyugin ring and the I-Ring have both proven to be safe intraoperatively, as they do not contain any sharp or pointed edges.
The Malyugin ring has four, equidistant loops which can ‘hook’ the iris and dilate the pupil to approximately 6 mm in diameter. Similarly, the I-Ring has four loops used for iris attachment; however, it has 360-degrees of iris contact, providing consistent pupil expansion without iris distortion. Both devices use an injector for insertion and removal through the main corneal incision.
Description of Technique:
Insertion of the Malyugin Ring: The insertion of the Maylugin Ring is performed using an injector through the main corneal incision. After the tip of the injector is inserted into the anterior chamber, the surgeon moves the thumb slide (located on the injector) distally to slowly inject the ring. As the ring is slowly inserted, the distal loop of the ring is attached to the iris, as seen in this video. Attachment of the lateral loops to the iris can sometimes be performed during this step but is not necessary. After the ring is completely inserted, the injector is removed. A Malyugin manipulator is used to position the remaining loops on the iris. In this video, the lateral loops are positioned first and the proximal loop is positioned last. This is done by grabbing each loop with the Malyugin manipulator and gently positioning the iris between the loop. Once all four loops are in position, the pupil is centered. Insertion of a Malyugin ring enlarges the pupil to 6mm in diameter.
Insertion of the I-Ring: I-Ring insertion is very similar to insertion of a Malyugin ring. The insertion device is introduced through the main corneal incision and the ring is injected by moving the thumb slider forward while gradually withdrawing the insertion device itself. A Sinskey hook is used to attach the ring via four positioning holes. It is suggested that the distal positioning hole is secured first, followed by the proximal hole and finally the lateral holes, as seen in this video.
Removal of Malyugin ring: Removal of the Malyugin ring is usually performed following intraocular lens placement. One the IOL is properly secured in the capsule, a Malyugin manipulator is used to remove the distal and proximal loops from the iris. As shown in the video, this is best accomplished by pulling the scroll to the left, following the curve of the ring. Once the distal and proximal loops are disengaged, the same insertion device is introduced into the anterior chamber and the thumb slide is moved distally until the hook appears. The hook is then used to pull the proximal loop into the insertion device. The Malyugin ring will fold back into the insertion device and can then be safely removed.
Removal of the I-Ring: The removal of the I-Ring follows the same basic concepts as the Malyugin ring, however it is not necessary to disengage the I-Ring from the iris before extraction. The insertion device is introduced into the anterior chamber. Using the thumb slider, the hook of the insertion device is allowed to engage the distal I-Ring, just lateral to the distal positioning hole. The I-Ring is then pulled slowly into the insertor allowing it to collapse on its own, following which the insertion device and I-Ring may be safely removed.
Faculty Approval by: Jeff Pettey, MD
Copyright statement: Copyright Teeples, ©2018. For further information regarding the rights to this collection, please visit: URL to copyright information page on Moran CORE
Disclosure (Financial or other): None
Divide-and-Conquer
Home / Ophthalmic Surgery / Lens and Cataract Surgery
Title: Divide-and-Conquer
Author: Troy Teeples, MSIV, Nikko Ronquillo, MD, Jeff Pettey, MD
Photographer: Troy Teeples MSIV, University of Utah School of Medicine
Date: 10/09/2018
Keywords/Main Subjects: Divide-and-conquer, phacoemulsification, cataract surgery
Brief Description: Divide-and-conquer is a frequently used technique in phacoemulsification cataract surgery. Here we discuss the basics of performing this technique.
Introduction:
The divide-and-conquer technique provides an efficient and functional technique to mechanically disassemble the nucleus by sculpting grooves with the phaco probe and cracking the lens into four distinct quadrants. This simple approach can help the surgeon reduce the amount of ultrasonic energy and time needed for a routine cataract case.
Description of Technique:
The divide-and-conquer technique is begun with the creation of a longitudinal groove in the lens using the phaco probe on “sculpt” setting. The groove must be wide (at least 1.5x as wide as the phaco tip) and deep in order to facilitate proper cracking. During creation of the grooves, care should be taken not to tear the capsulorhexis edge as this may propagate to a posterior capsular tear. When the first groove is completed, a second instrument is introduced into the eye and used to assist in dividing the nucleus. This is performed by placing both the second instrument and phaco tip deep into the groove and parallel to each other, after which the nucleus is then cracked by pulling the second instrument in the opposite direction of the phaco tip.
After the nucleus is divided into two, the second instrument is used to rotate the lens 90-degrees, lining up the lens for the creation of the subsequent groove. When properly aligned, the phaco probe is used to sculpt a second groove, perpendicular to the original. The more distal heminucleus is cracked first using the second instrument and phaco tip, after which the lens is rotated 180-degrees to crack the second heminucleus. Once the nucleus has been divided into four quadrants, each of the quadrants can then be phacoemulsified individually.

Faculty Approval by: Jeff Pettey, MD
Identifier: Moran_CORE_25443
Copyright statement: Copyright 2018. Please see terms of use page for more information.
Disclosure (Financial or other): None
Prepping and Draping
Home / Ophthalmic Surgery / Lens and Cataract Surgery
Title: Prepping and Draping
Author: Troy Teeples MSIV, Tara Hahn MD, Nikko Ronquillo MD, Jeff Pettey MD
Photographer: Troy Teeples MSIV, University of Utah School of Medicine
Date: 10/09/2018
Keywords/Main Subjects: Draping, prepping, cataract surgery, surgical field
Brief Description: This video demonstrates how to properly prep and drape a patient in preparation for cataract surgery.
Introduction:
Maintaining a clean surgical field is imperative for the prevention of infectious complications such as post-operative endophthalmitis. Although rare, this complication is sight-threatening and every preventative measure should be taken to avoid it. Here we show proper surgical preparation and draping of a patient for cataract surgery.
Description of Technique:
Before arriving to the OR, the surgical eye will have been anesthetized with topical proparacaine and lidocaine gel (note that there are variations in preoperative topical anesthesia protocols at different institutions). In the video, the nurse places a sterile towel over the head. A drop of 5% Betadine solution is then placed to the surgical eye followed by cleaning of the surgical eye, starting centrally and moving peripherally using a Raytec 4×4 sponge. It is important not to return to the eye after cleaning more peripheral areas with the same sponge. The upper eyelid is then gently elevated using a cotton swab and a second swab soaked in 5% Betadine is used to clean the superior then the inferior eyelid margins.
After the eye and ipsilateral face and forehead are cleaned at least three times, the Betadine is allowed to dry for at least 2 minutes (there are institutional differences of how long to wait before draping). For draping, a new sterile blue towel is placed over the forehead and tucked under the head to keep it in place. Next, a 4×4 is used to dry the eyelashes and periorbital area. It is important to dry the eyelids well to ensure that the drapes stick properly. The handle of a cotton swab is then used to elevate the superior eyelid while the patient is asked to look down and the drape is placed directly over the eye and pulled open on both sides. An assistant can be handed the bottom part of the drape, which is snapped over a swan in order to tent the drape up, ensuring that it does not cover the patient’s mouth. Using drape scissors, a slit is cut open medially and extended temporally. Finally, an eyelid speculum is placed.
Faculty Approval by: Jeff Pettey, MD
Identifier: Moran_CORE_25436
Copyright statement: Copyright 2018. Please see terms of use page for more information.
Disclosure (Financial or other): None
Capsulorhexis: Flat Tear vs Fold/Lead
Home / Ophthalmic Surgery / Lens and Cataract Surgery
Title: Capsulorhexis: Flat Tear vs Fold/Lead
Author (s): Troy Teeples, MSIV, Nikko Ronquillo, MD, Tara Hahn, MD, Jeff Pettey, MD
Photographer: Troy Teeples, MSIV University of Utah School of Medicine
Date: 8/8/2018
Keywords/Main Subjects: Capsulorhexis, lens capsule, cataract surgery
Brief Description: A crucial step in cataract surgery is the creation of a capsulorhexis, performed to make cataract extraction and IOL placement possible. Here we discuss two possible techniques of capsulorhexis creation.
Introduction:
Capsulorhexis is a technique performed by removing a portion of the anterior lens capsule with the use of stretch and shear forces. A correctly-sized and well-centered capsulorhexis allows adequate access to nuclear material and prevents complications such as IOL tilt post-operatively. In routine cataract surgery, the ideal capsulorhexis is a 5.0 – 5.25mm diameter round opening in the anterior lens capsule. There are multiple techniques used in the creation of a capsulorhexis. Demonstrated in this video are both a fold/lead and a flat tear technique.
Technique Description:
An optional step prior to making a capsulorhexis is the use of a ring caliper on the cornea, as seen in the first segment of this video (ring caliper footage taken from a separate case). A ring caliper is used to make a circular corneal impression approximately 5mm in diameter to guide the surgeon in making a well-centered and correctly-sized capsulorhexis. To begin the capsulorhexis, the central portion of the anterior lens capsule is punctured using either a bent needle, called a cystotome, or the tips of the capsulorhexis forceps. In this video, a capsulorhexis forceps is used. A flap from the anterior capsule is then gently grasped by the capsulorhexis forceps and a circular tear is begun clockwise or counterclockwise.
In the fold/lead technique, the capsular flap is folded towards the center prior to re-grasping. It important that the surgeon re-grasps the capsular flap close to the lens to maintain control while making a tear in the capsule. Multiple grasping maneuvers are necessary to be close to the leading edge of the tear. In contrast, with the flat tear technique the surgeon grasps the capsule flap and completes the 360-degree capsulorhexis with less re-grasping maneuvers. To achieve this, tangential forces are required as the leading edge of the tear is farther from the flap being held by the forceps. Care must be taken to pull with the correct amount of force and in the correct vector, to avoid radializing the capsulorhexis and creating posterior capsular tears. When the capsulorhexis is complete, the torn portion of the capsule is removed from the eye and discarded.
In this video, the first half of the capsulorhexis (3 o’clock to 9 o’clock) is performed using the fold/lead technique, whereas the second half of the 360-degree capsulorhexis is performed using the flat tear technique.
Faculty Approval by: Jeff Pettey, MD
Identifier: Moran_CORE_25259
Copyright statement: Copyright Teeples, ©2018. For further information regarding the rights to this collection, please visit: http://morancore.utah.edu/terms-of-use/
Disclosure (Financial or other): None
Hydrodissection and Hydrodelineation
Home / Ophthalmic Surgery / Lens and Cataract Surgery
Title: Hydrodissection and Hydrodelineation
Author (s): Troy Teeples, MSIV, Nikko Ronquillo, MD, Tara Hahn, MD, Jeff Pettey, MD
Photographer: Troy Teeples, MSIV University of Utah School of Medicine
Date: 8/8/2018
Keywords/Main Subjects: Hydrodissection, hydrodelineation, cataract surgery
Brief Description: Hydrodissection is a technique used to free the lens from the capsular bag to facilitate easier extraction. Hydrodelineation is a similar technique performed with the goal of separating the epinucleus and endonucleus.
Introduction:
Hydrodissection is a vital step in cataract surgery in which the lens capsule is separated from the lens cortex with the use of a balanced salt solution (BSS). When properly performed, the lens will be freely mobile and detached from its surrounding capsule, facilitating an easier extraction during phacoemulsification. In addition, an effective hydrodissection will allow for an easier cortical clean up, thus reducing the risk of capsular rupture during cortical extraction.
Hydrodelineation is a technique similar to hydrodissection, where BSS is used to separate the outer epinuclear shell from the central endonucleus. The purpose of hydrodelineation is to temporarily maintain the epinuclear shell, which acts as a protective shield in which to confine the ultrasonic energy emitted during phacoemulsification of the endonucleus. In addition, the remaining epinuclear shell keeps the capsule on stretch, preventing the bag from unexpectedly coming forward, occluding the phaco tip and tearing.
Description of Technique:
Hydrodissection is performed after creation of the capsulorhexis. A Chang canula is attached to a syringe filled with a balanced salt solution (BSS), inserted into the eye, and then directed 180-degrees from the main incision. It is then gently placed under the anterior capsule and advanced forward ensuring visualization of the tip. The anterior capsule is gently lifted, and the cannula is pointed towards the lens equator, taking care as to not puncture the capsule or damage the zonules. Gentle, continuous irrigation of BSS generates a fluid wave which cleaves the cortex from the posterior capsule. A fluid wave will cause the lens to slightly bulge upwards from the pressure exerted by the BSS. Using the canula, the central portion of the lens is carefully depressed, forcing the fluid trapped posteriorly to escape and resulting in further disrupting the equatorial cortical-capsular adhesions. A successful hydrodissection is demonstrated when the nucleus can be rotated easily by the canula.

Hydrodelineation is also performed after creation of the capsulorhexis. This step most often follows hydrodissection but may also be performed without hydrodissection. A Chang canula is placed in the nucleus, angled downward and forward toward the central plane of the nucleus until the nucleus starts to move. When the nucleus starts to move the endonucleus has been found. The canula is then directed tangentially to the endonucleus and a tract is carefully created using the canula itself, into which BSS is gently and steadily injected. The fluid will follow the path of least resistance, cleaving the epinucleus from the endonucleus. A successful hydrodelineation will result in a golden ring or dark circle around the endonucleus, signifying a circumferential division of the nucleus.

Faculty Approval by: Jeff Pettey, MD
Identifier: Moran_CORE_25251
Copyright statement: Copyright Teeples, ©2018. For further information regarding the rights to this collection, please visit: http://morancore.utah.edu/terms-of-use/
Disclosure (Financial or other): None
Hydration of the Clear Corneal Incision and the Wong Pocket
Home / Ophthalmic Surgery / Lens and Cataract Surgery
Title: Hydration of the Clear Corneal Incision and the Wong Pocket
Authors: Troy Teeples, MSIV, Tara Hahn, MD, Nikko Ronquillo, MD, Jeff Pettey, MD
Photographer: Troy Teeples, MSIV
Date: 8/7/2018
Keywords/Main Subjects: Wound hydration, Wong Pocket, clear corneal incision, hydration, hydration fill
Brief Description: Hydration is a common technique used to create a watertight seal of the Clear Corneal Incision (CCI) at the end of cataract surgery. Here we describe how to hydrate the CCI with and without filling the anterior chamber. We also describe an alternative technique to create a watertight seal using the Wong Pocket.
Introduction:
After completion of phacoemulsification of the lens nucleus and IOL insertion, a watertight seal of corneal wounds is needed to prevent possible post-operative complications including wound-leakage, anterior chamber collapse and post-operative endophthalmitis. Hydrating the corneal stroma with BSS is the conventional method given its relative ease of use. When hydrating a wound, it is sometimes necessary to fill the anterior chamber with BSS to increase the IOP. Here we describe a technique to hydrate the wound with and without filling the anterior chamber by simple manipulation of the angle of the canula.
A second technique to ensure a watertight seal of the CCI is by creating a Wong Pocket. A Wong Pocket is a small, partial-thickness corneal incision anterior to the CCI formed at the beginning of cataract surgery. At the conclusion of the case, the Wong Pocket is hydrated, thus creating an inward pressure on the CCI. The combined inward pressure generated by the Wong Pocket and outward pressure from the IOP of the anterior chamber create a secure, long-lasting seal of the corneal wound.
Description of Technique:
Hydration Fill: To start, a 30-gauge half-inch canula is attached to a 2mL syringe filled with a balanced salt solution. In order to seal the CCI, the canula is advanced into the lateral wall of the incision at a 90-degree angle. It is important that the cannula is pushed directly to the stroma and not to the anterior chamber. BSS is then injected into the corneal stroma until diffuse whitening occurs, after which these steps are repeated on the other side of the incision. This allows for hydration of the incision without filling the anterior chamber. When filling the anterior chamber with BSS is necessary at this step, the cannula is simply angled towards the anterior chamber (> 90 degrees, as shown in the video).
Wong Pocket: In order to create a Wong Pocket, a 1.5mm – 2mm partial-thickness corneal incision (forming an equilateral triangle with its base towards the limbus) is created using a diamond or metal keratome. This pocket should be both superior and anterior to the intended CCI and have a depth of roughly one half the stromal thickness. At the conclusion of the case, a 30-gauge cannula filled with BSS is pointed downwards and inserted into the Wong Pocket. BSS is then injected, thus hydrating the ‘roof’ of the CCI and creating a watertight seal.
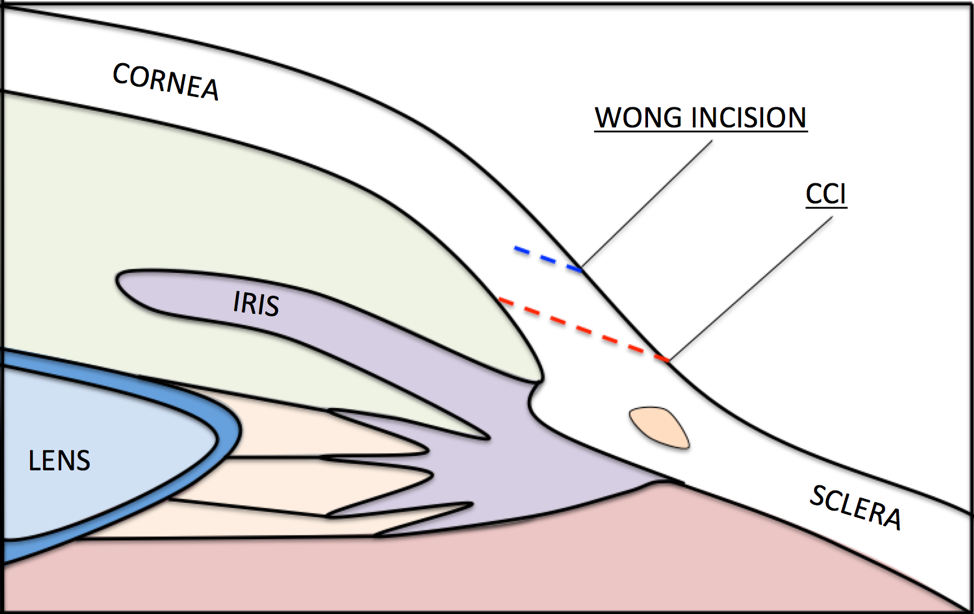
Image Description: Cartoon depicting the location of the Wong Pocket, created before the clear corneal incision (CCI).
Faculty Approval by: Jeff Pettey, MD
Identifier: Moran_CORE_25242
Copyright statement: Copyright Teeples, ©2018. For further information regarding the rights to this collection, please visit: http://morancore.utah.edu/terms-of-use/
Disclosure (Financial or other): None
The Effect of Transscleral Diode Cyclophotocoagulation Using Micropulse versus Continuous Wave on Ciliary Body Observed in Miyaki Apple View
Title: The Effect of Transscleral Diode Cyclophotocoagulation Using Micropulse versus Continuous Wave on Ciliary Body Observed in Miyaki Apple View
Author: Tara Hahn, MD; Srav Vegunta, MD; Joshua Bo Heczko, MD; Craig Chaya, MD
Date: 2018
Keywords/Main Subjects: Transscleral Diode Cyclophotocoagulation; Micropulse; Continuous Wave
Diagnosis: N/A
Brief Description: Winner of the 2018 Best Surgical Video from the American Glaucoma Society. A discussion of the cyclophotocoagulation procedure. Compares safety of two techniques.
Format: mp4
Series: N/A
Identifier: Moran_CORE_25028
Copyright statement: Copyright 2018. Please see terms of use page for more information.